Tuesday, December 31, 2013

New Year greeting e-cards

Hello everyone, in this post I would like to present you my latest New Year greeting e-cards. All these e-cards are available on my website, seiza.ro:


Christmas / New Year ecard with spanish text. Color model: RGB. Format: jpeg file. Dimensions: 600x500px. If you like this image you can send it as a virtual greeting card from my website: seiza.ro - free greeting e-cards.


Corporate invitation for the Christmas / New Year party. Format: musical/animated. Color model: RGB. Dimensions: 600x500px. If you like this image you can send it as a virtual greeting card from my website: seiza.ro - free greeting e-cards.


Christmas / New Year ecard with french text. Format: jpeg. Color model: RGB. Dimensions: 600x500px. If you like this image you can send it as a virtual greeting card from my website: seiza.ro - free greeting e-cards.


New Year greeting ecard. Color model: RGB. Dimensions: 600x500px. If you like this image you can send it as a virtual greeting card from my website: seiza.ro - free greeting e-cards.


Corporate Christmas / New Year ecard with german and english text. Color model: RGB. Dimensions: 600x500px. If you like this image you can send it as a virtual greeting card from my website: seiza.ro - free greeting e-cards.


Winter ecard. Color model: RGB. Dimensions: 600x500px. If you like this image you can send it as a virtual greeting card from my website: seiza.ro - free greeting e-cards.

Tuesday, December 3, 2013

Virtual Nengajo

Hi, everyone.

Because the Japanese New Year (お正月, o-shōgatsu) is coming, I have drawn some new virtual Nengajo's (japanese New Year greeting cards).

The New Year holidays (o-shōgatsu) are very important to the Japanese. In the last days of the year, approximately four billion post cards expressly intended for use as New Year's cards are sold throughout Japan.

Although traditionally these greeting cards were sent only by post, in recent years people have started to send virtual Nengajo's as well as printed Nengajo's. If you have japanese friends (or japanese clients, colleagues, business partners, etc) whom you want to congratulate on New Year, the easiest way to do so is to send them virtual Nengajo's.

This Nengajo will be very soon available as a free eCard on my website, seiza.ro:

Virtual Nengajo. Image size: 600x500 px. Text meaning (from right to left): The text written inside the circle: Kinga Shinnen = japanese expression equivalent with 'Happy New Year'. The first two columns: 'Thank you for all your hard work (great help) during the past year'. The 3rd column: 'I hope (ask) for your favour again in the coming year'. Last column: Gantan - the morning of January 1st.

Thursday, July 25, 2013

CorelDRAW basics: restore the hidden toolbars

As I've said in a previous posts, there are several methods to access a hidden toolbar:
1st: go to Menu Bar, choose Window -> Toolbars and check the toolbars you want to display
2nd: right click on any toolbar or on the Tool Box; the list containing the names of the toolbars will be displayed and you can choose from this list the toolbars you want to display.
3rd: use the shortcut "Alt + o" to open the Tools menu (this method works only if the Menu Bar is displayed).

These three methods will work only if you keep at least one toolbar active. Anyway, if you are reading this post I assume that you were curious to see what's happen if you close all the toolbars and now you are surfing the web trying to find a solution to restore the them on the screen.

So, if you've just turned off all the application's toolbars you have two methods to restore them:
1. Use the CTRL + J shortcut to open the Options panel and check the toolbars you want to open (see the image below)


2. Right-click anywhere inside the Drawing window and, without moving the mouse, right-click again (a double-right-click). From the contextual menu choose the toolbars you want to display (see the image below):

Tuesday, June 25, 2013

CorelDRAW basics: dockers

A docker displays the same types of controls as a dialog box but it has the advantage that it will stay opened (unless you choose to close it), so it would be easy for you to access the commands you need. If you are familiarized with other graphic programs you've probably encountered this feature under the name of "Palettes".

To access a docker, click Window -> Dockers, and click a docker. As you can see in the image below, there are many dockers available and, if you choose to open too many of them, the dockers panel will become cluttered and it will be hard to manage the dockers. You can avoid this problem by closing all unused dockers. To close a docker, click the X button located in the upper right corner of the docker's window.


Dockers can be either docked in the edge of the application window or floating over the application window (see the image below). I prefer to keep all the dockers grouped in the docker panel, but sometimes it's preferable to undock some of the dockers and to drag them in the drawing window.

If you open more than two dockers in the docker panel they usually appear nested, with only one docker fully displayed. In the image above I have 4 dockers opened: the Object properties docker which is floating over the drawing area and another three dockers stoked in the docker panel: the Blend docker, which is fully displayed and two hidden dockers: the Extrude docker and the Bevel docker. You can display a hidden docker by clicking the docker’s tab.

If you need more space for the drawing window you can collapse both the floating dockers and the dockers panel. To collapse or expand the dockers panel click the arrow button at the top corner (see the image below).

Sunday, March 31, 2013

CorelDRAW basics: the Property bar

JW27EVPHTGYG
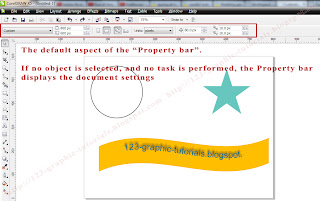
The Property bar is one of the most useful of the CorelDRAW's default toolbars; it contains the most commonly used functions that are relevant to the active tool or to the task you’re performing. The Property bar is not a toolbar; when you start the CorelDraw the Property bar displays informations regarding the current document; as you continue to work, the Property bar content changes depending on the active tool (or the performed task).


When no object is selected and no task is performed, the Property bar display the current document settings.


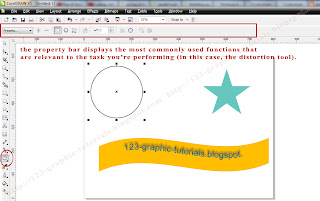
In the image above the Distortion tool is selected. The Property bar displays various distortion commands and options.


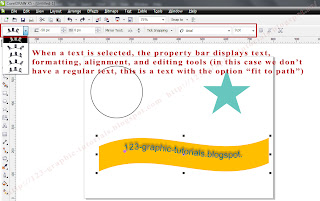
In the image above a text aligned to a path is selected. The Property bar displays various commands and options which can help you to edit the text or to set / edit the text alignment.


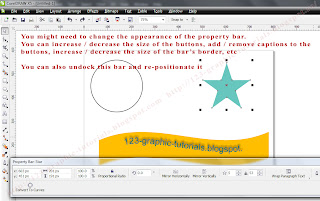
If you need it, you can customize the Property bar: you can dock / undock it, move it anywhere on the screen, modify it's appearance, and you can also set up a custom property bar by adding, removing, and rearranging toolbar items. If you want to change the bar's appearance go to the main menu, choose Tools -> Customization -> Command Bars and click on the Property bar. Now you can change the size of the buttons, the bar's border, the buttons appearance, etc.


In the image above the Property bar is floating in the lower side of the screen. Use the grab area to dock/undock/move the Property bar. Place it inside the application window if you need a floating property bar. Place it on any of the four sides of the application window if you want to dock it (to make it part of the window border).


If you (really) need to you can set up a custom property bar by adding, removing and rearranging the toolbar items. Go to main menu, choose Tools -> Customization -> and click on Commands. Choose an item from the commands list and drag it to the Property bar (see the image below, where the "Insert page before" is added to the Property bar). The new item will be included in the Property bar of the active tool or task (if you change the active tool, the new item will not be displayed in the Property bar; when the related tool will be activated, the new item will become visible again). If you want to remove an item from the property bar, drag the toolbar item icon off the property bar. Important: it is not a good idea to change the default items of the Property bar.


If you want to, you can add or remove items on / from the Property bar or you can customize a Property bar by rearranging the items.

Sunday, February 17, 2013

CorelDRAW basics: the Standard toolbar

The Sandard toolbar is one of the CorelDRAW's default toolbars; it contains some very useful commands (see the image and the list below). Anyway, if you want more space for your Drawing window and, beside that, you are familiarized with the application's shortcuts, you can hide this toolbar.

The standard toolbar contains buttons that are shortcuts to some of the menu commands. You can customize this toolbar (Tools -> Customization -> Commands) to fit your needs: if you don't need some of the buttons you can remove them, you can change the order of the toolbar's buttons, you can add some new buttons on the toolbar, you can modify the toolbar appearance, etc. The image and the list below contain the default buttons of this toolbar:
1. start a new drawing
2. open an existing drawing
3. save
4. print
5. cut the selected objects to the Clipboard
6. copy the selected objects to the Clipboard
7. paste the Clipboard contents into your drawing
8. undo an action
9. restore an action that was undone
10. import a drawing
11. export a drawing
12. start Corel applications
13. open the Welcome screen
14. set a Zoom level
15. enable / disable the automatic alignment
16. open the Options dialog box


If you want to hide the Standard toolbar (or if the toolbar is not displayed and you need it) do one of the following:
1 - Go to Menu toolbar, choose Window, Toolbars and check / uncheck the Standard toolbar

2 - Right click on any toolbar and check / uncheck the Standard toolbar (see the image below)

3 - Use the "ALT + O" shortcut to open the Tools menu -> choose Customization -> Command Bars and check / uncheck the command bars you want to display / hide (see the image below)

Saturday, January 19, 2013

CorelDRAW basics: the Application window

CorelDRAW basics: a brief presentation of the Application window:

1. The Title bar Here is displayed the title of the currently open drawing

2. The Menu bar

3. The Toolbar - here we can find several shortcuts for some very useful commands (Save, Print, Undo - Redo, the magnification level, etc). You can customize this area to fit your needs.

4. The Property bar is a detachable bar with commands related to the active tool or object (see the two images below to see the differences between the content of the Property bar when various objects are selected)


5. The Drawing page is the printable area of your work area

6. The Drawing window is the area which surrounds the Drawing page

7. The Toolbox is a docked bar (you can not move it) with tools for drawing, filling, colouring and modifying objects

8. The Docker area contains the available commands and settings relevant to a specific tool

9. The Color palette contains color swatches. This bar can be docked or can float over the work area

10. The rulers - use this tool to determine the size and position of the objects. If you don't see them click View in the Menu Bar and click on Rulers

11. The Document navigator allows you to move between pages and to add pages to your document

12. The Status bar is the area at the bottom of the application window that contains information about object properties (type, size, color, fill, resolution). The status bar also shows the current cursor position

13. the Navigator is a smaller display in the lower-right corner which help you move around a drawing (see the image below)

Saturday, January 12, 2013

Learn Corel PaintShop Pro X4: the Manage workspace - the Navigation Palette (3)

Read the first two parts of this post here:
Learn Corel PaintShop Pro X4: the Manage workspace - the Navigation Palette (1)
Learn Corel PaintShop Pro X4: the Manage workspace - the Navigation Palette (2)

Use the calendar to find your images. The Calendar search help you to find your photos according to the date they were taken. You can search by a specific date or select a certain period of time. The dates highlighted in the calendar are the dates when the images were created (or edited).


Use tags to browse your photos. By adding keyword tags to your images it will be easier to find them. It's better to add multiple tags to a single image (e.g: landscape, forest, name_of_the_project_for_which_you_need_the_image, etc).

Display images by tags:
In the Navigation palette, open the Collections tab; if the tags list is collapsed double-click on Tags button to open it. Click on the tag you want to use; all the images associated with that tag will be displayed as thumbnails in the Organizer palette.

here only the images associated with the tag "nengajo" are displayed as thumbnails in the Organizer palette


By clicking the No Tags button will be displayed only the images that have no tags.

Sometimes you'll need to delete tags from Tags catalog (when there are too many tags in the list or when you need only several specific tags). Right-click on the tag you want to delete from Tags catalog and choose Delete. By doing so you'll exclude the tag only from the Tags catalog list; if you want to completely remove one tag from your images you have to use the Info palette.


You can also to add a tag in the Tags catalog. Click the Add Tags button to open the Add Tags dialog box, type the tag and click Ok. The tag will apear in the tags list but there will be no images associated with this tag. To assign the tag to one or more images, go to the Organizer palette select one or more thumbnails of the images that you want to tag and drag it / them over the tag.


The Navigation palette provides you one more useful tool for browsing your images: Display images by image rating. Click on the buttons indicating the number of stars to display the images which match the click on the No rating button to display the images which don't have a rating.

Friday, January 11, 2013

Learn Corel PaintShop Pro X4: the Manage workspace - the Navigation Palette (2)

Read the first part of this post here:
Learn Corel PaintShop Pro X4: the Manage workspace - the Navigation Palette (1)

If you don't want to search for images in your computer you can just browse your computer; you can browse for photos in your computer by using the Collections tab if you want to browse your favorite photos or the Computer tab if you want to browse through all the folders and devices on your computer.

To view the photos in a folder click one of the two tabs (Collections or Computer), double-click a folder to display the subfolders tree and click on the folder that contains the photos that you want to view. The thumbnails of all supported photo or video files in the selected folder appear in the Organizer palette.

Add a folder to the Collections page: click the Collections tab and after that click the Browse More Folders icon to open the Browse for Folder dialog box. In the Browse for Folder dialog box navigate to the folder containing the images you want to view, and then click OK. The folder is added to the Folders list and all the photos contained by the folders are imported into Corel PaintShop Pro.

If you want to view all the cataloged folders click the Collections tab to open the Smart Collections tree and here click the All Photos icon

Tuesday, January 8, 2013

Learn Corel PaintShop Pro X4: the Manage workspace - the Navigation Palette (1)

The Navigation palette helps you find and organize your photos. In this post I'll try to present you this very useful palette.

1. The Search box - is located in the very top of the Navigation palette. Use this box every time you need a fast search. You can search by filenames, by extensions (e.g.: *.jpg will find all the jpeg files), names of folders, tags, caption texts, or images metadatas.

2. If you have hundreds or even thousands photos in your computer you might need a more complex search; in this case, you can use the Advanced search.
In order to use the Advanced search you have to follow these steps:
1. In the Navigation palette click to open the Collections tab
2. Open the Smart Collections list by double-clicking on it
3. Click the Add Smart Collection button and the Smart Collection dialog box will appear
4. Select one of the two options in the Find photos that match drop-list: choose All (the default option) if you want to search for images that match all of the specified rules or Any, if you want to search for images that match any of the specified rules
5. Select the first search option from the first drop-list
6. Select an option to refine the search further from the second drop-list (the options that appear in the drop-list depend on the search option that you chose in the first drop-list)
7. In the text field, type or choose a search term. The search term you type must correspond to the search option that you choose in the first drop-list of the search rule.
8. (optional) You can add an additional search rule by clicking the "+" button in the right-side of the Smart Collection dialog box. Click on the "-" button to remove the additional search rule.
9. Click the Preview button. The search results appear in the Organizer palette.


the Smart Collection dialog box


If you want, you can save the search you've used as a Smart Collection: click the Save button in the Smart Collection dialog box and the Save as Smart Collection dialog box will appear; type a name for your search and click on Save. The collection will appear in the Smart Collections list.

After you save an Advanced Search as a Smart Collection you can run it again anytime you need it (by clicking on it's name in the Smart Collection list), you can edit it (if you want to change the search parameters), you can rename it or you can delete it when you consider that you don't need it anymore.

Sunday, January 6, 2013

Learn Corel PaintShop Pro X4: customize the Workspaces - General Program Preferences (4)

Read the first three parts of this post here:
Learn Corel PaintShop Pro X4: customize the Workspaces - General Program Preferences (1)
Learn Corel PaintShop Pro X4: customize the Workspaces - General Program Preferences (2)
Learn Corel PaintShop Pro X4: customize the Workspaces - General Program Preferences (3)

10. The Manage tab. Here you'll find two group boxes: the Thumbnail images group box and the Excluded items group box. In the Thumbnail images you can set how the thumbnails will appear in the Manage workspace: - mark or unmark the Show ratings with thumbnail images check box if you want to show / hide the ranks of the images
- mark or unmark the Show file name with thumbnail images
- by marking the Allow cataloging to complete after exiting the application check box you'll speed up the display of thumbnails when the application starts

In the Excluded items group box you have two buttons: the File format exclusions button and the Uncataloged Folders button. Use these buttons to exclude specific file formats from appearing in the Manage workspace and to exclude specific folders (e.g: Trash, windows files) from cataloging.


11. Setting Auto-Preserve preferences - a very important option which allow you to save copies of the original images in a backup folder.

12. Default launch Workspace - the last tab of this list. Use it to set which workspace will appear when Corel PaintShop Pro starts (the default workspace is Manage Workspace)

Saturday, January 5, 2013

Learn Corel PaintShop Pro X4: customize the Workspaces - General Program Preferences (3)

Read the first two parts of this post here:
Learn Corel PaintShop Pro X4: customize the Workspaces - General Program Preferences (1)
Learn Corel PaintShop Pro X4: customize the Workspaces - General Program Preferences (2)

6. The Units tab. Here you can set a unit of measurement for your documents (choose pixels if your image is for internet; choose centimeters or inches if you want to print your image). Here you can also set the default resolution for the images (only for the images which doesn't have a resolution value). Choose a higher resolution if you want to print the images.

7. Setting Transparency and Shading preferences - here you can set the size and the color of grid size (see the image below). You can also choose to shade the non-selected areas when using the Crop tool and to set the level of opacity of the shaded area.

Transparency and Shading preferences


the floating crop toolbar


8. Setting Warnings preferences - Corel PaintShop Pro displays a warning dialog box when you are about to perform an operation that will result in the loss of information or when the operations cannot be performed. Is recommended to enable all the warnings.

9. Auto Action - you can automate actions that must be performed in order to further edit an image. Sometimes, some actions must be performed in order to edit an image. For example, some commands can be performed only on images with a bit depth of at least 8 bits per pixel. When you choose a command for an image with a bit depth lower than 8 bits per pixel, the Auto Actions dialog box appears with the message that the image must be converted to a higher bit depth in order to proceed with the command. Choose one of the following options:
Never — prevents the selected action from happening. By choosing this option you'll make certain menu commands inactive if the action is required to complete the command. Some items in the list do not have this option available.
Always — performs the action automatically without displaying a prompt box
Prompt — the program will display a prompting box anytime you'll try to perform the action

Friday, January 4, 2013

Learn Corel PaintShop Pro X4: customize the Workspaces - General Program Preferences (2)

Read the first part of this post here: Learn Corel PaintShop Pro X4: customize the Workspaces - General Program Preferences (1)

4. Setting Palettes preferences. Use this tab if you want to:
- Set the color mode (RGB or HSL) in which to display color information
- Set how color values are displayed in ToolTips or in a Color dialog box (choose the Decimal display option or the Hexadecimal display option)
- Set how paletted images display available colors in the Rainbow tab or in a Color dialog box (choose between "Show rainbow picker" or "Show document palette"). This option is available only for the images with 256 or fewer colors.
- Show 16-bit color values in ToolTips (available only for the 16-bit images)
- Make palettes undockable - use this option if you don't like the standard arrangement of the palettes in the workspaces
- Set whether palettes appear automatically; choose one of the following options: 1. "Always" — displays palettes appropriate to the tools and commands you are using. 2. "Never" — displays palettes only when you choose to open them. 3. "With Learning Center" — displays palettes appropriate to the topics accessed in the Learning Center palette. This is the default setting.
-Set display options for the Layers palette

Tuesday, January 1, 2013

Learn Corel PaintShop Pro X4: customize the Workspaces - General Program Preferences (1)

In order to customize the workspaces go to File -> Preferences -> General Program Preferences. There are many settings you can use to customize the PaintShop Pro's workspaces; a few of these settings will be discussed in this tutorial.

1. First (and also very important) is the Undo tab. The Undo settings help you to control the Undo and Redo commands and an option of the History palette.


First thing you have to do here is to check the "Enable the undo system" check box. If this check box is not marked, you won't be able to use the "Undo" option. Next, you can check some of the following check boxes:
Limit undo/redo disk usage to ____ MBytes of storage per open image. The storage space needed depends on the current image size and the type of operations you’re performing. If your HardDisk is full, you might need this option, but if you have enough free space it would be better to let this check box unmarked.
Limit undo/redo to ____ steps per open image. By default you can undo 250 steps; this is far too much (especially considering that the "Undo" levels require memory; the more undo levels you use, the more system memory is consumed). 50-60 Undo steps are more than enough.
Enable fast redo - mark this check box if you want to set the Redo command to work at a higher speed. Anyway, this option will slow down the Undo process, which is a useful, so you'd better let this check box unmarked.
Set a value in the Non-undoable steps in the History Palette control. The Non-undoable steps cannot be undone or redone. However, they can be reapplied to the current image or to other open images, saved to a Quickscript or to a regular PspScript file, or copied to the Clipboard.

2. The View tab: use these settings to control how the image window and magnification level when you resize an image.

3. THe Setting Display and Caching preferences tab. Use it if you want to:
- Automatically use the last file format used to save an image
- Show / Hide Dropper tool color information
- Change the appearance of tool cursors
- Make a brush tool cursor reflect its size and shape
- Adjust the Zoom Rescaling quality
- Set thumbnail sizes for the Effects Browser
- Specify preferences for saving an image cache


To be continued